As nice as it would be to have a professional photographer following me around, that’s sadly never going to happen. Since I don’t always have someone around to help me with photos, I’ve had to be resourceful when it comes to getting photos for my blog. The photos I took when I started out 2.5 years ago were REALLY rough. But as the months went on, I gradually figured out a few tricks that dramatically improved my photos.
The good news is you don’t have to invest in expensive photography equipment to get good photos, nor do you have to hire a professional either. You can put my tips into practice with $0 investment and 0 helpers and still get some nice photos.
Whether you’re taking pics for your blog, Instagram, or just creating a lookbook for yourself, I hope the tips and tricks I’ve learned will help you get photos you love quickly and easily.
Use natural light
Whether you’re taking a random phone pic to send to your girlfriend or you’re a professional photographer getting paid thousands, lighting is the absolute most important part of capturing clear, beautiful photos. Since we aren’t going to be investing in elaborate pro lighting setups today, that means natural light will be your best friend. Try to avoid overhead lights or lamps for your photos–it’s just not the same! Artificial light can distort colors or cast weird shadows.
Start to pay attention to which rooms in your house get the best light. Experiment with taking photos in a few different rooms that look like promising candidates. You want the light to be moderate, though; if it’s too bright, you’ll look like a ghost. I also recommend trying photos in different locations in the room (e.g., different walls) to determine which spot gives you the best results.
Another important variable: time of day. One room can be the perfect photo spot during one time of day and a hopeless disaster a few hours later. For example, in my old townhouse, I got the best photos between about 1 and 3 pm. In my current house, I get the best photos from around 10 am to noon. Take note that times shift a little bit depending on the time of year, since the season affects the sun’s position and therefore the light in your house.
If your lighting indoors is poor, try going outside if you have a spot for it. The light in my house is not as bright as I like, so I find I get better colors and whiter whites when I take photos outside in the shade. For example, all of the photos in this post were taken outdoors in the shade of my back patio.
If you take photos outdoors, I recommend using a shady spot or on a cloudy day. Try to avoid direct sun, because it creates harsh shadows and isn’t as flattering.
Find a neutral backdrop
What’s behind you in your photos is so important. In order for your outfit to stand out, you want a background that is neutral in color and/or relatively plain. Walls are ideal. Try to minimize furniture, art, or other visual clutter behind you.
If you have enough space, stand a little bit away from the wall rather than right next to it. The further away you stand, the more out of focus the wall will be. This makes the subject of the photo (you!) stand out more.
If you really can’t find a neutral background, you can create one. I bought a large melamine sheet from Home Depot for $10. You can see it in action in this shoe post. The whole sheet was too big to fit in my car, so I had the folks at the store cut it down into two pieces for me. The sheet I found is very thin (about 1/8″), which means each piece is lightweight and easy to move around.
Make a DIY tripod
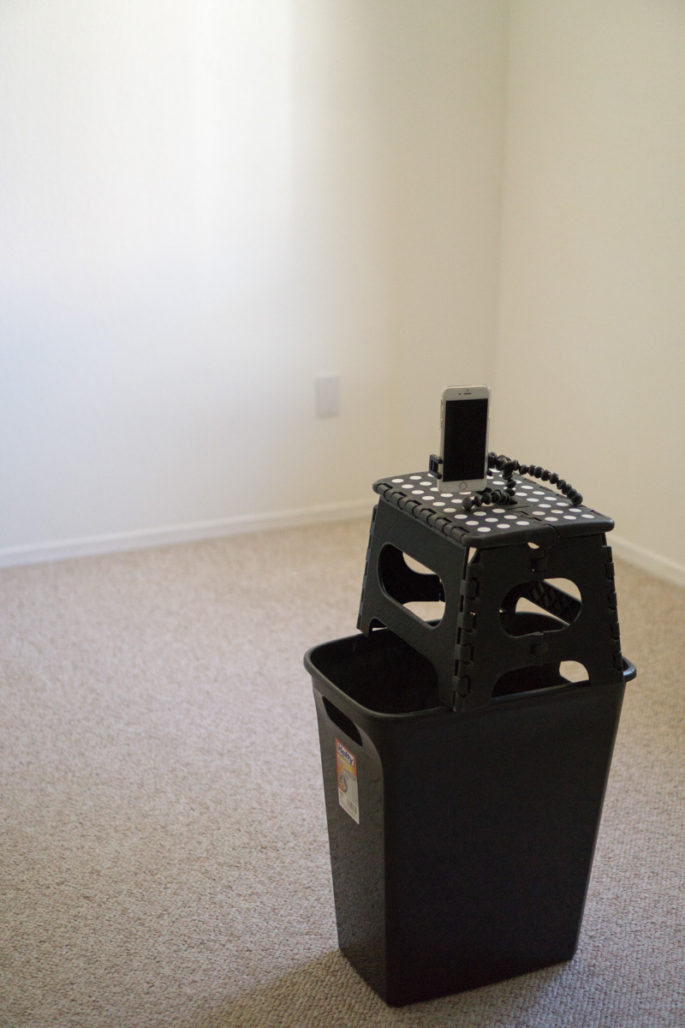
The tripod I used for YEARS was literally a step stool on top of a trash can. It doesn’t get much more low-tech and cheap than that!
Although I’ve since purchased a real tripod for my real (non-phone) camera, I still use the same setup for iPhone photos:

For extra height, I stack a shoe box or two on top of the stool. When I need photos from a lower angle, I collapse the stool on its side or use the trash can only (turned upside-down). Look for items around your house that you can use in a similar fashion. It doesn’t have to be fancy!
When I started out, I had an iPhone 5, which had squared off edges. I would take it out of my silicone case, and then lay the case on the stool. Wedging the phone in the case at a 90-degree angle, so that the sides of the case squeezed the bottom of the phone, was just enough tension to keep it upright. Since the newer iPhone models have rounded edges, this method didn’t work anymore. I ended up spending a whole $30 (hah) on a Joby tripod, which is the spindly thing you can see in the photo above. Unfortunately, the Joby tripod is a total pain in the neck for vertically oriented photos, and is much more suited to horizontal ones. I didn’t realize this at the time, sadly. If you’re taking mostly vertical photos too, I recommend looking for a different tripod.
If you want to keep your setup at $0, just grab a sneaker! You can prop your phone up in the heel of the shoe. It might take a little fussing to get the position right, but when you do, it actually works really well!
Time yourself
There’s no need to invest in a Bluetooth remote right away. Just use the self-timer function on your phone for an effective and free solution. If your phone doesn’t have one, there are free apps out there that will do the trick. A 10-second timer will give you enough time to hit the button, walk in front of the camera, and adjust your pose.
Set up a mirror
It took many frustrating months of taking photos to come up this trick, but oh man, it has saved me HOURS.
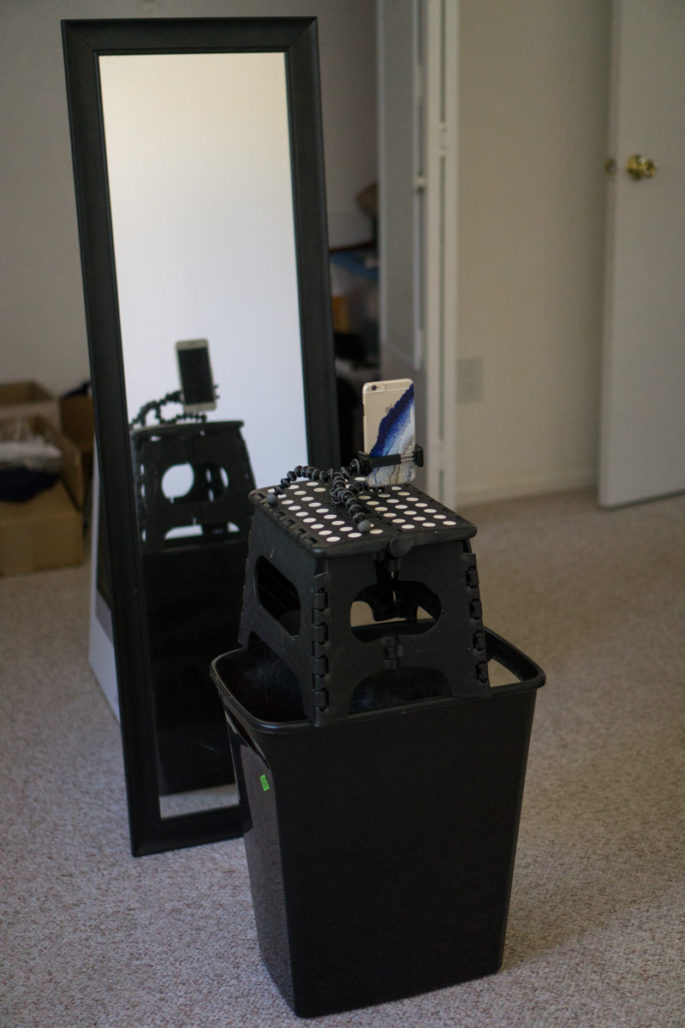
Behind your tripod, prop up a mirror so you can see the screen of your phone/camera, like this:

This way, when you start the timer and walk in front of the camera, you can glance in the mirror to see if you’re in the frame and move if you need to. I’ve had to throw out hundreds of photos because I was halfway out of the frame! Seriously, save yourself the trouble and use a mirror.
If a mirror isn’t practical for you, an alternative is to use the front camera on your phone. That said, the front camera is much lower quality, so I prefer to avoid using it when I can.
Extra credit: edit your snaps
If you really want your photos to shine, a few quick edits go a long way. I often adjust the highlights and/or brightness, contrast, warmth/temperature, and saturation. These simple edits don’t have to make your photo look fake, in fact they usually make the photo look more vibrant and true to life. The key is to make small, subtle edits, rather than crank the setting to the max.
In terms of apps to use, VSCO is an absolutely awesome photo editing app and is totally free. Afterlight is also a fabulous app, but will cost you a few bucks. And of course, Instagram has great photo editing powers. Even if you don’t want to post the photo you’re editing, you can still use Instagram’s editing tools. When you get to the share screen, select “direct message” instead of “new post” and just send the edited photo to yourself. If you’re on a computer, Mac’s built-in Preview software works well in a pinch.


These are great tips! I’m starting to take more outfit pics on my blog and I can never do them myself. Definitely going to try out your tips :)
Thanks Gretchen! It definitely takes patient, but once you get the hang of it, it’s not so bad. :)
The mirror tip is GENIUS!!!! Thank you!
You’re welcome! I actually discovered it by accident because one day my mirror was right behind my “tripod” and I was like, hey wait a minute… :)
Okay, I never thought to use a mirror, too. LOVE that tip! So helpful.
Thanks Katherine! It’s a game changer for sure.
Love this concept. I’ve been wanting to add styling on my blog but don’t want to pay for a photographer at the moment. These are great pointers.
Yup, you gotta do the best you can with what you have! It’s ok if it’s not perfect right away, you can always upgrade to a photog later. :)
Great tips and I’ll add one more – use an interval timer, (I use Camera Awesome) instead of the self timer. Then I can take several shots then pick the best one.
I love that tip, Shirley! Definitely helpful for when you’re taking pics from multiple angles, too. I’ll have to try it out!
If you’re in the market, the Apple Watch can control your iPhone camera too. Don’t get me started on how wonderful it is for running and leaving your phone at home. No thigh pockets? No problem!
Ohhh nice! I didn’t know that about them. :)
Thank you so much for posting this. it is so helpful!!
I have to be honest. For years I’ve known about your website. It’s just that I never read it on a regular basis. I would sometimes Google something about an piece of clothing and your website would show up on the results. I would read it every now and then and that would be all.
A couple months ago I stumbled upon an article you wrote about how to make money with your blog. I found it very interesting and forgot about it.
Today I happened to come across this website again. And I saw this article. I have to say, I am so impressed with the time, energy and research you put into your articles! I am going to come visit weekly to see what else is new.
Anyways, what I’m trying to say is a BIG THANK YOU for your hard work!!
Thanks for such a thoughtful and kind comment, Danika! :) I’m so glad you’ve found a few posts that have been helpful to you. That’s exactly my goal–just to write useful stuff, no matter how often you visit. It’s definitely a ton of work and pretty exhausting sometimes, but it’s worth it to me. Thanks again for chiming in!